Maintaining
Sessions in .NET framework
Session in
C#
In this article am going to explain how to create sessions
for your website, web portal or any other dynamic stuff using the
functionalities of .NET framework along with Visual Studio and MS SQL server (any
version; am using VS’10 and SQL: v8)
[Coding is in C#]
[Coding is in C#]
Session |
Basics
In general session can be defined as the link or interface
between our database and any dynamic content based on internet or networking.
Session performs these set of activities:
- User Info
- Maintenance
- User Interaction with module
- Some Security aspects
etc.
Session performs these set of activities:
- User Info
- Maintenance
- User Interaction with module
- Some Security aspects
etc.
Session |
Procedure
There are generally two steps in it,
(You need already created database)
- Coding in .CS file page
- Coding in page label
(You need already created database)
- Coding in .CS file page
- Coding in page label

Session |
Reference Example
Step: 1
First of all we have to open a .cs file in visual studio, by
following the process as shown below and then after that, do coding in that and
save file name as ABC.cs
Let’s start, first of all follow these steps:
Let’s start, first of all follow these steps:

After clicking on website option, a window like this will
get open:

In this window you have 2 choices; either you can go with
visual basic or c#. My domain is c# so am preferring this. Now follow these
steps:

After clicking on OK, a blank page will get open, now on
that blank page click on SOLUTION EXPLORER and follow this:
- On clicking SOLUTION EXPLORER a window like this will come out:

-
Now Right click on C:\...\Website\
-
After then click on ADD NEW ITEM
[On clicking there a window like this will come out]
[On clicking there a window like this will come out]
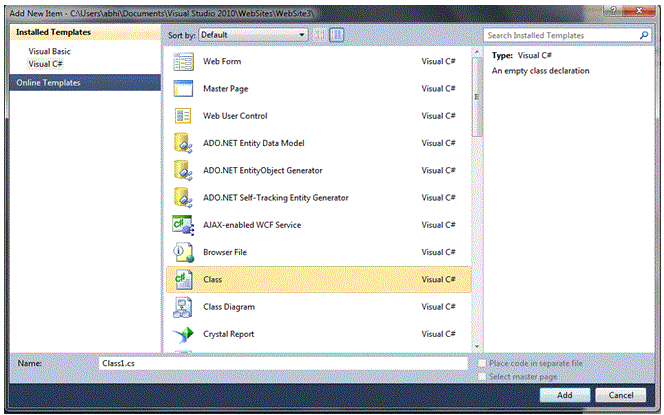
Here search for ‘class’ option
and click on that. A “.cs”
file will get generated. Now start coding there as mentioned below:
CODE:
using System;
using System.Collections.Generic;
using System.Linq;
using System.Web;
using System.Web.UI;
using System.Web.UI.WebControls;
public partial class _Default : System.Web.UI.Page
{
protected void
Page_Load(object sender, EventArgs e)
{
}
protected void
Button1_Click(object sender, EventArgs e)
{
Session.Add("Response",TextBox1.Text);
Response.Redirect("profile.aspx");
}
}
Step: 2
Now create .CS file of label page. You can do that by
extracting it from solution explorer.
- Click on solution explorer
- Right Click on .cs file
- Extract file or label page
- Click on solution explorer
- Right Click on .cs file
- Extract file or label page
Now perform these coding steps in that label page.
CODE:
using System;
using System.Collections.Generic;
using System.Linq;
using System.Web;
using System.Web.UI;
using System.Web.UI.WebControls;
public partial class profile : System.Web.UI.Page
{
protected void
Page_Load(object sender, EventArgs e)
{
// Label1.Text =
Session["Response"].ToString();
Label1.Text =
Session["Response"].ToString();
}
}
_________________________________________
for more info and technical stuffs, please visit:
_________________________________________
No comments:
Post a Comment